Плагины для sketchup при проектировании дома: понятие и виды- инструкции +видео и фото
Содержание:
- Editing a component with the Solid tools
- Авторизация SketchUp – Один пользователь
- Opening from and downloading to your computer
- Updating extensions
- Learning how to use SketchUp tools
- Choosing loading policy preferences
- Adding intelligence using Dynamic Components
- Choosing loading policy preferences
- Системные требования
- Customizing thumbnails the Scenes dialog
- Enabling and disabling extensions
- Managing extensions in the Extension Warehouse or within SketchUp
- Creating your own materials
- Enabling and disabling extensions
- Creating your first 3D model in SketchUp
- Uninstalling or removing extensions
- LayOut
- How to Install Sketchup Plugins
- Auto-save and temporary back-up files
- Understanding how SketchUp for Web features work differently from the desktop version of SketchUp
Editing a component with the Solid tools
When you edit a component with the Solid tools, the steps are little different than the steps for editing components with the other drawing tools.
Tip: To start, if you want to use the Solid tools to edit a subcomponent within a component, you need to explode the main component. For example, to edit the Picket component with the Subtract tool, which is one of the Solid tools, you need to explode the Fence Panel component so that you can click the Picket component immediately after selecting the cutting object. After you’re done editing the Picket component, you can re-create the Fence Panel component.
The following steps explain how to edit a component with the Solid tools, using the fence model as an example:
- Edit the component with a Solid tool In this example, the Subtract tool cuts a hole in the Picket component. In the Entity Info panel, notice that the name of the component instance changes from Picket to Difference.
- To update the component definition so that all pickets reflect your changes, context-click the modified picket and select Make Component.
- In the Create Component dialog box, make sure the component Name Definition matches the original component name. In this example, that name is Picket.
- Click the Create button. A dialog box asks whether you want to replace the component definition.
- Click Yes. All instances of your component reflect the change you made with the Solid tool or tools.
- (Optional) If you exploded a component to access subcomponents, you can re-create the component. For example, select all the entities in the updated fence and re-create the Fence Panel component.
Авторизация SketchUp – Один пользователь
Если вы приобрели подписку на SketchUp, ваша авторизация регулируется вашей подпиской и входом с помощью идентификатора Trimble ID. После выполнения входа на рабочий стол SketchUp с помощью идентификатора Trimble ID программное обеспечение будет активировано для использования в течение срока действия активной подписки.
Windows:
- Если вы еще не и не SketchUp, сделайте это.
- Дважды щелкните значок SketchUp 2015 на рабочем столе.
- Дважды щелкните значок SketchUp 2016 на рабочем столе.
- Дважды щелкните значок SketchUp 2017 на рабочем столе.
- Дважды щелкните на значок SketchUp 2018 на рабочем столе.
- Дважды щелкните значок SketchUp 2019 на рабочем столе.
- В приветственном диалоговом окне SketchUp нажмите кнопку Добавить классическую лицензию в нижнем правом углу.
Если диалоговое окно «Добро пожаловать в SketchUp» не открылось, выберите Справка > Лицензия. - В приветственном диалоговом окне SketchUp нажмите Добавить классическую лицензию внизу
- В диалоговом окне «Лицензия» нажмите кнопку Добавить лицензию…
- При покупке SketchUp вам было отправлено электронное сообщение с лицензией и кодом авторизации. Откройте это письмо с подтверждением лицензии и найдите информацию о версии SketchUp, которую вы хотите авторизовать.
Каждая лицензия и номер авторизации уникальны для версии SketchUp. Если вы устанавливаете новую версию SketchUp, то вам нужно будет использовать новую лицензию и код авторизации. Если вам не удается найти письмо с подтверждением лицензии, то вы можете просмотреть информацию по вашей текущей лицензии здесь. - Скопируйте и вставьте свой серийный номер и код авторизации в диалоговом окне.
- Щелкните Добавить лицензию. Лицензия будет загружена из облака на ваш компьютер.
Mac:
- Если вы еще не и не SketchUp, сделайте это.
- Откройте Finder и нажмите Приложения.
- Перейдите в папку SketchUp 2015.
- Перейдите в расположение папки SketchUp 2016.
- Перейдите в расположение папки SketchUp 2017.
- Перейдите в папку SketchUp 2018.
- Выберите папку SketchUp 2019.
- Щелкните значок SketchUp.
- В приветственном диалоговом окне SketchUp нажмите кнопку Добавить лицензию в правом нижнем углу диалогового окна.
Если диалоговое окно «Добро пожаловать в SketchUp» не открылось, выберите SketchUp > Лицензия… - Откройте электронной письмо подтверждения, полученное вскоре после покупки лицензии.
- Скопируйте и вставьте свой серийный номер и код авторизации в поля диалогового окна.
- Щелкните Добавить лицензию. Лицензия будет загружена из Интернета на ваш компьютер.
В следующем видео вы узнаете, как выполнить аутентификацию лицензии для выбранной версии SketchUp Pro.
Авторизация SketchUp Pro 2019 с помощью классической лицензии
Авторизация SketchUp Pro 2019 с помощью подписки
Opening from and downloading to your computer
If you prefer to work with SketchUp files stored locally on your computer, this is possible in SketchUp for Web.
Opening local files
To open SketchUp model stored on your computer, follow these steps:
- Go to the Home tab, by clicking the ‘hamburger’ menu icon in the very top left of your screen. (The Home tab is also the first screen that loads when you start up SketchUp for Web).
- Click the Open button, and select ‘My computer’
- Navigate and select to your desired file. Click ‘Open’
With this method, your model will load into SketchUp for Web as a temporary file. Until you click ‘Save’, your file will not be uploaded to Trimble Connect. If you don’t want to save your model in Connect, follow the instructions below to back to your device.
Tip: Another way to add models is to go to the Trimble Connect tab and simply drag/drop a file from your computer. You can also use the Add model button. Either way, your file will upload and display as selected. From here, all your modeling progress on this file will be saved in Trimble Connect. You can download the file back to your device at any time.
Downloading files
If you need a copy of your SketchUp file — or prefer to save and store your files locally — you can always download the model you are working on to your computer. Follow these steps:
- Make sure the model you want to download is loaded in the modeling window.
- Open the file operations menu at the top of your screen
- Select the ‘Download’ command. You’ll be prompted to choose a SKP version to download. If you plan to re-upload your model to SketchUp for Web, you can choose any version. If you want to use your file in a desktop version of SketchUp, you’ll want to pick a version that corresponds to that desktop version.
- Click OK to download your model.
Updating extensions
A developer might update an extension to add a feature, fix a bug, or make an older version of an extension compatible with Ruby 3.0.
To update extensions in the Extension Warehouse, follow these steps:
- In SketchUp, select Extensions > Extension Warehouse and sign in to the Extension Warehouse.
- Select My Extensions from the user menu. The Extension Warehouse opens to the My Extensions tab shown in the following figure. This tab shows all the extensions you’ve installed through the Extension Warehouse. (If you installed an extension manually from another source, that extension won’t appear here. See Adding Extensions to SketchUp for details about manual installation through SketchUp Preferences.)
- To update all your extensions at once, click Update All at the top right of the My Extensions tab. To update a specific extension, click the Update option to the right of the extension’s name.

If you install an extension through the Extension Warehouse (rather than manually), the Extension Manager knows when an extension update is available.
When an extension has an update, a couple of alerts let you know:
- A message appears on-screen.
- A little red circle appears next to the Manage tab, as shown in the following figure. The number in the circle reflects the number of updates.
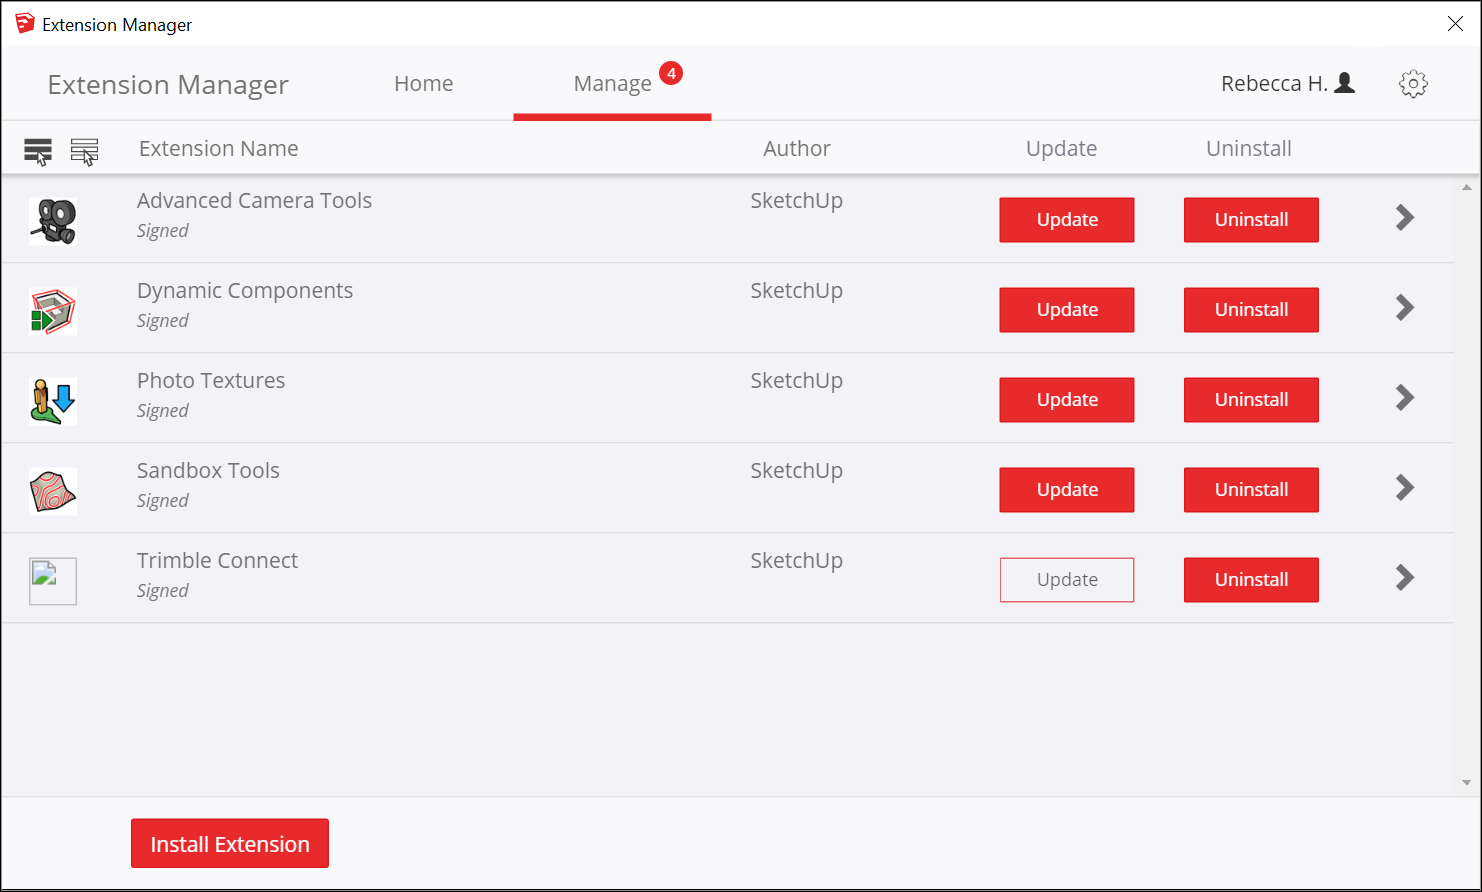
To update an extension in the Extension Manager, follow these steps:
- In SketchUp, select Extensions > Extension Manager. The Extension Manager window appears.
- Click the Manage tab at the top.
- Click the Update button next to the extension that you want to update. Or to install all the updates at once, select the extensions you want to update and click the Update option that appears at the very top of the column.
Learning how to use SketchUp tools
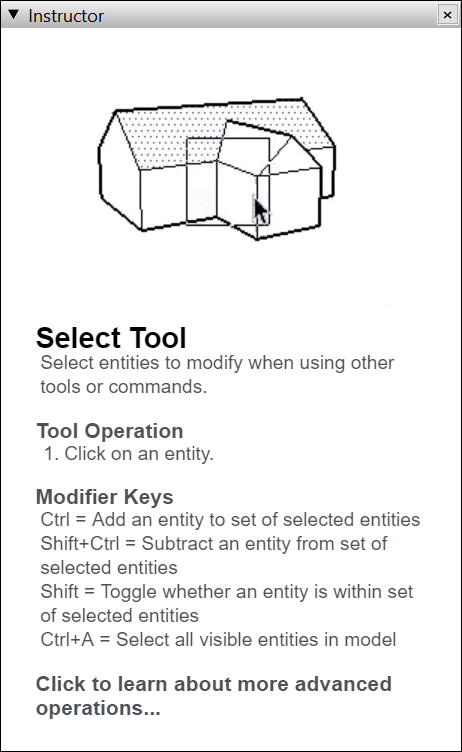
As you use SketchUp, the Instructor and the status bar give you pointers on using each tool.
The Instructor teaches you how to use the currently selected tool. To turn on the Instructor, shown here, select Window > Instructor, or click the question mark icon in the status bar. Here’s what the Instructor has to offer:
The Instructor teaches you how to use the currently selected tool. To turn on the Instructor, shown here, select Window > Instructor, which you find in the Default Tray. Here’s what the Instructor has to offer:
The Instructor teaches you how to use the currently selected tool. To turn on the Instructor, shown here, select Window > Instructor. Here’s what the Instructor has to offer:
- An animation that shows basic use of the selected tool
- A description of what the tool does
- Steps for using the tool, which correspond to the animation
- Modifier keys that enable the tool perform additional functions
- A link to Help Center articles about advanced functions of the tool
If the Instructor offers more detail that you need, remember that the status bar also offers tips on using the selected tool. See the section earlier in this article for details.
Choosing loading policy preferences
You can choose an extension loading policy that determines what extensions can and cannot be loaded when SketchUp starts.
SketchUp has three loading policy modes:
- Identified Extensions Only: In this mode, SketchUp loads an extension only if a registered SketchUp developer digitally signed the extension.
-
Approve Unidentified Extensions: This mode lets you choose which extensions load each time SketchUp starts. You see a list of found extensions and Ruby files in the Load Unidentified Extensions? dialog box. Select which of these you want to allow to load. SketchUp will remember which extensions you have approved. You see the approval dialog box each time you start SketchUp so you can change your approvals before any extensions are loaded.
Note: Identified extensions do not appear in the list when SketchUp starts. They load automatically.
- Unrestricted: This mode is the least secure. All extensions and Ruby files load when SketchUp starts, and the Load Unidentified Extensions? dialog box won’t open. Use this mode only if you trust all the extensions that you have installed.
Tip: Unidentified extensions cannot be loaded while in Identified Extensions Only mode. You can switch to Approve Unidentified Extensions mode and then .
Note: Unrestricted is the default extension loading policy.
You can switch between modes at any time. However, to unload extensions that SketchUp has already loaded, you need to restart.
To choose your extension loading policy, follow these steps:
- Select Extensions > Extension Manager.
- In the Extension Manager window that appears, click the gear icon in the upper right.
- In the Settings window that appears, select your desired loading policy and click the Confirm button.
- Extension Warehouse
- installing extensions
- plugin
- extensions
- plugins
- extension
- install extension
Adding intelligence using Dynamic Components
Basic attributes
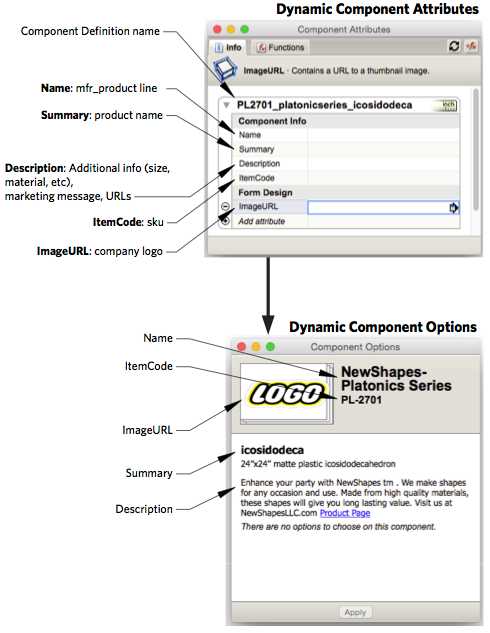
SketchUp lets you assign extended attributes to a Component, things like Name, Summary, Description and ItemCode using Dynamic Components. Below is a screen capture of the Dynamic Component Attributes dialog box. By default, it shows the Component name at the top, with the additional attributes below in an editable box. The bottom image shows how this information will be displayed in the Options dialog.
If you have assigned properties (or options) to the Component, using Dynamic Component attributes you might want to change the defaults that are seen in the thumbnail for 3D Warehouse.
Advanced attributes and user interaction
 SketchUp offers four attributes that can be easily applied to a component using the Dynamic Component interface. The diagram above shows where to place the four pieces of recommended information so that it displays when the Component Options dialog is opened. You can add additional attributes to the Component to affect the display of the Component, such as arrangement of sub-Components, product color, and standard options, to name just a few.
The following illustrations diagram how this works. Attributes are assigned to a Component within the context of the Component. The attribute is applied to either the whole Component, or to its sub parts. Attributes can set colors, product options, sizing and more.
 All of these attributes exist inside the context of the component and travel with the component when it is imported into another model.
But to allow the user to interact with these settings, there has to be a series of attributes that are applied to the outside of the context, setting values that are used by the attributes inside the context. These outer attributes get displayed to the user in the component options dialog.
 This component options dialog can only be accessed from outside the component. This means that you cannot see them when you are working inside a component model file. The component file must be imported into a working file so that the dialog showing the outer options for that component can be displayed.
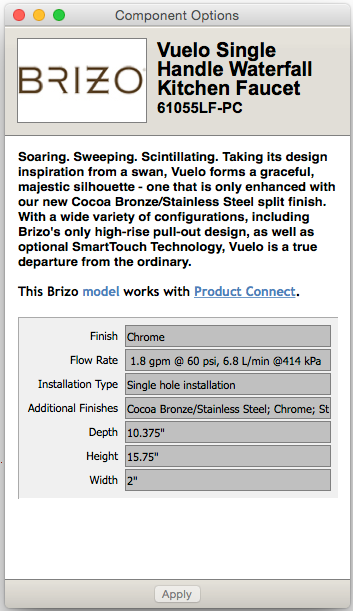
Here is a dialog showing the options that can be set for a faucet. The values the user sets here get used within the Dynamic Component to perform calculations, set materials, and display one option versus another.
From a working file, you can set the options you want for the component’s thumbnail when it is uploaded to 3D Warehouse.
Dynamic component case study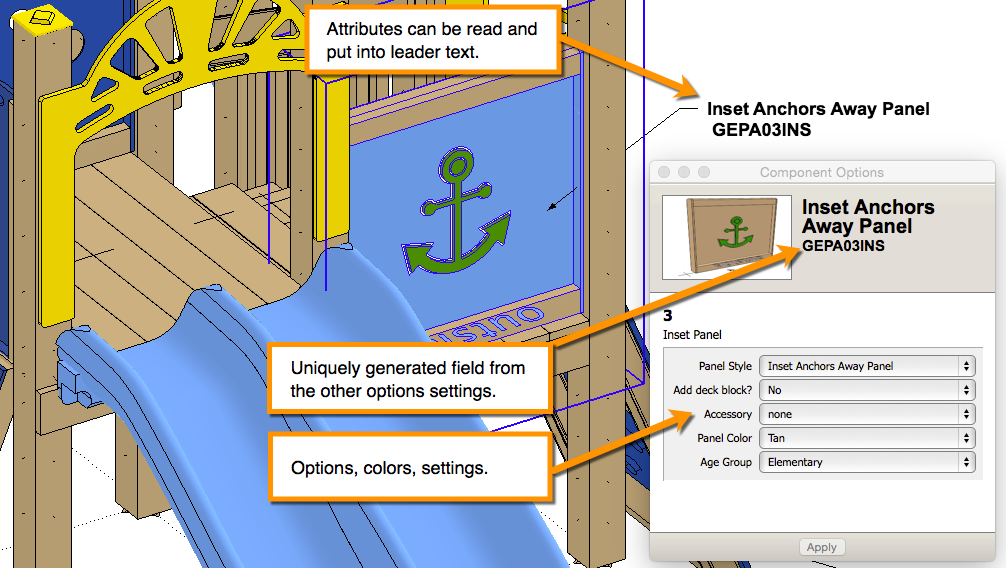
Attributes can manipulate text and numbers from other attributes to dynamically create labels (for example build the full product name based upon chosen options).
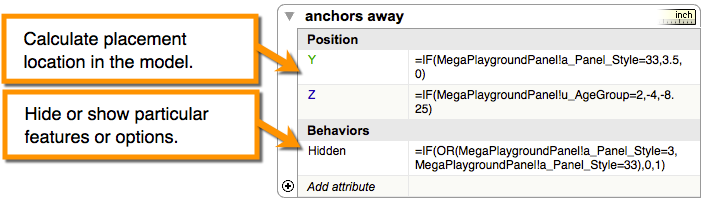
Attributes can perform calculations (for example, placement of subcomponents) or control display of sub parts, hiding or showing them. (for example, add a steering wheel).

Attributes can control options (for example panel color, age group, panel style).
Choosing loading policy preferences
You can choose an extension loading policy that determines what extensions can and cannot be loaded when SketchUp starts.
SketchUp has three loading policy modes:
- Identified Extensions Only: In this mode, SketchUp loads an extension only if a registered SketchUp developer digitally signed the extension.
-
Approve Unidentified Extensions: This mode lets you choose which extensions load each time SketchUp starts. You see a list of found extensions and Ruby files in the Load Unidentified Extensions? dialog box. Select which of these you want to allow to load. SketchUp will remember which extensions you have approved. You see the approval dialog box each time you start SketchUp so you can change your approvals before any extensions are loaded.
Note: Identified extensions do not appear in the list when SketchUp starts. They load automatically.
- Unrestricted: This mode is the least secure. All extensions and Ruby files load when SketchUp starts, and the Load Unidentified Extensions? dialog box won’t open. Use this mode only if you trust all the extensions that you have installed.
Tip: Unidentified extensions cannot be loaded while in Identified Extensions Only mode. You can switch to Approve Unidentified Extensions mode and then .
Note: Unrestricted is the default extension loading policy.
You can switch between modes at any time. However, to unload extensions that SketchUp has already loaded, you need to restart.
To choose your extension loading policy, follow these steps:
- Select Extensions > Extension Manager.
- In the Extension Manager window that appears, click the gear icon in the upper right.
- In the Settings window that appears, select your desired loading policy and click the Confirm button.
- Extension Warehouse
- installing extensions
- plugin
- extensions
- plugins
- extension
- install extension
Системные требования
- Операционная система: Mac OS или Windows x64.
- Процессор: 1,0 GHz для Windows или 2,1 для Mac OS.
- Видеокарта: 3D c 512 MB и поддержкой OpenGL 2.0 для Mac OS или 3.0 для Windows.
- Оперативная память: от 4GB.
Свободное место на жестком диске: от 500 MB для установки самого редактора и около 200 MB для компонентов LayOut и Style Builder.
Внимание! Программа не поддерживает операционные системы семейства Linux и более старые версии Windows (XP, Vista). Помимо SketchUp Pro 2017, вы также можете скачать более раннюю версию SketchUp Pro 17.1.174 и SketchUp Make 16.1
В чем их отличие, рассмотрим далее
Помимо SketchUp Pro 2017, вы также можете скачать более раннюю версию SketchUp Pro 17.1.174 и SketchUp Make 16.1. В чем их отличие, рассмотрим далее.
Customizing thumbnails the Scenes dialog
In the Scenes dialog, you can customize how the scene thumbnails and the list of scenes appear.
The following options enable you to control how the scene thumbnails appear:
- If you don’t want to see the thumbnail images, click the Details arrow() and deselect Use Scene Thumbnails.
- If you update a scene and want the thumbnail to reflect the update, click the Details arrow and select Update Scene Thumbnail.
Click the View Options () menu in the upper right of the Scenes dialog, and you can select from the following options, which control how your lists of scenes appears:
- Small Thumbnails: You see only thumbnails, not the scene names, and more than ten thumbnails are visible in the list at once, before you need to scroll in order to see more scenes. However, as the option name indicates, the thumbnail images are quite small.
- Large Thumbnails: See only large thumbnail images of a scene, not the scene name. With this option selected, you can see about six thumbnail images at a time.
- Details: This is the default option, which shows medium-sized thumbnails, the scene name, the photo if your scene has one, and the scene description. You see more information but fewer scenes in this view.
- List: See only the scene names in a list. The text is a bit larger in this view than in the Details view.
Enabling and disabling extensions
Disabling an extension unloads it from SketchUp. You might want to disable an extension in the following circumstances:
- An extension can take up resources even when you’re not using it, so disabling unneeded extensions can help SketchUp run as fast as possible.
- Disabling extensions can declutter SketchUp’s menus and toolbars. If you rarely use an extension, you can disable it so that it’s out of the way until you need it.
To disable an extension in the Extension Warehouse:
- In SketchUp, select Extensions > Extension Warehouse and sign in to the Extension Warehouse.
- Select My Extensions from the user menu. The Extension Warehouse opens to the My Extensions tab.
- Disable any extension by clicking its Disable option. After you disable an extension, it becomes grayed out, moves to the bottom of your My Extensions tab, and has an Enable option, which you can click to re-enable the extension.
Alternately, you can enable or disable an extension in the Extension Manager. Follow these steps:
- In SketchUp, select Extensions > Extension Manager. The Extension Manager window appears.
- Click the Enabled or Disabled button next to the extension whose status you want to change.
- Click the Apply Changes button, and your extension is enabled or disabled. To back out of the change, click the Discard Changes button.
Managing extensions in the Extension Warehouse or within SketchUp
You can manage extensions in the Extension Warehouse on the My Extensions page. Also, within your copy of SketchUp, the Extension Manager enables you to manage your extensions and offers a few features that control how your copy of SketchUp works with your extensions.
The following table outlines what extension-management features you find on the Extension Warehouse My Extensions page (online) and what features you can control in Extension Manager.
Tip: Extension Manager communicates with the online My Extensions page so that your extensions are managed seamlessly.
| Feature | My Extensions Page (Online) | Extension Manager |
|---|---|---|
| Update extensions | ||
| Enable or disable extensions | ||
| Install or uninstall extensions | ||
| Remove extensions | ||
| View signature status | ||
| Select loading policy |
Creating your own materials
The materials included in SketchUp help you start using materials and explore how they work. To apply materials specific to your own design or building, you probably need to create your own materials. The process is pretty easy: Start with an image to create a texture tile and then specify a color if needed.
Windows
To create a new material from your own files or color codes, follow these steps:
- In the Materials panel, click the Create Material icon () in the upper right.
- In the Create Material dialog box that opens, type a name for the new material in the text field at the top.
- Choose the color, texture, and opacity options for your new material. The options work just like those in the Edit panel. Refer to the earlier section, , for details. Or, for help understanding the color options, see Mixing Colors in the Color Picker.
- Click OK. Your new material appears selected in the In Model collection.
MacOS
To create a new material that’s a texture, follow these steps:
- In the Colors panel, click the Textures Palette tab (the one with the brick icon).
- Select the collection where you want the new material to appear.
- Select Color > New Texture.
- In the dialog box that appears, select an image file for your texture.
- In the panel that appears, type a name for the texture, set the width and height for the tile size, and click OK. If you want to colorize the texture, follow the steps in the earlier section, .
And here’s how to save a specific color as a material:
- Use any of the color tabs to create your desired color, which appears in the color swatch at the bottom of the Colors panel. See Mixing Colors in the Color Picker for details.
- Select the Textures Palette tab (also known as the brick icon).
- Navigate to the collection where you want to save the color.
- Drag the color swatch from the bottom of the Colors panel into the collection’s swatches area.
Tip: You can also expand your materials collections by downloading materials. Check out this post from the SketchUpdate blog for details.
- Colors browser
- Materials browser
- Paint Bucket tool
- SketchUp
- video
Enabling and disabling extensions
Disabling an extension unloads it from SketchUp. You might want to disable an extension in the following circumstances:
- An extension can take up resources even when you’re not using it, so disabling unneeded extensions can help SketchUp run as fast as possible.
- Disabling extensions can declutter SketchUp’s menus and toolbars. If you rarely use an extension, you can disable it so that it’s out of the way until you need it.
To disable an extension in the Extension Warehouse:
- In SketchUp, select Extensions > Extension Warehouse and sign in to the Extension Warehouse.
- Select My Extensions from the user menu. The Extension Warehouse opens to the My Extensions tab.
- Disable any extension by clicking its Disable option. After you disable an extension, it becomes grayed out, moves to the bottom of your My Extensions tab, and has an Enable option, which you can click to re-enable the extension.
Alternately, you can enable or disable an extension in the Extension Manager. Follow these steps:
- In SketchUp, select Extensions > Extension Manager. The Extension Manager window appears.
- Click the Enabled or Disabled button next to the extension whose status you want to change.
- Click the Apply Changes button, and your extension is enabled or disabled. To back out of the change, click the Discard Changes button.
Creating your first 3D model in SketchUp
If you’ve never created a 3D model in SketchUp (or any other modeling program), the following steps offer a quick overview the basics:
- Select the person, context-click the selection, and select Erase in the context menu that appears.
- In the Getting Started toolbar, select the Rectangle tool ().
- On the ground plane, in the space between the red and green axis, click the Rectangle tool cursor (). Then move your cursor to the right and click again. A rectangle appears on the ground, as shown here.
- On the Getting Started toolbar, select the Push/Pull tool (), and place the Push/Pull cursor over the rectangle you just created, as shown in the following figure.
- Click and drag your rectangle up into a 3D shape. Keep an eye on the Measurements box and release the cursor when your shape is about 5 feet tall.
- Without clicking or selecting anything, simply type 6’ and press Enter. Notice how the height of your shape changed to exactly 6 feet tall, and the value you entered appears in the Measurements box.
- In the Getting Started toolbar, select the Orbit tool (). Place the Orbit cursor above your shape. Then click and hold while you move the mouse down. Notice how the view of your shape changes, as shown in the following figure. Practice clicking and dragging with the Orbit tool as much as you like. It’s a pretty fun tool!
- In the Getting Started toolbar, click the Zoom Extents button (). If you orbit around until you lose track of where you are in your model, the Zoom Extents button is a handy way to reorient yourself.
- If you have a scroll-wheel mouse, scroll down to zoom out a bit. Working in SketchUp is much easier with a scroll-wheel mouse. However, if your mouse lacks a scroll wheel, click the Zoom tool () and you can zoom in and out that way, too.
Tip: No matter what tool is selected, holding down the scroll wheel activates the Orbit tool until you release the scroll wheel.
- In the Getting Started toolbar, click the Paint Bucket tool ().
- In the Materials panel that appears, select Colors from the drop-down menu, as shown here. Then select a color from the options that appear on the Select tab.
- Click one side of your model with the Paint Bucket cursor to apply your selected color. Experiment a bit with the different options in the drop-down menu if you like. For example, select Landscaping, Fencing, and Vegetation from the drop-down menu and apply pebbles to your model. Select Tile from the drop-down menu and apply a tile pattern that you like. Orbit around and apply different materials to each side of your model, as shown here.
- Close the Materials panel and select Window > Styles.
- Close the Materials panel and select Window > Styles, which appear in the Default Tray.
- From the drop-down menu, select Sketchy Edges and then select a style option. In the following figure, Marker Wide is selected. Notice that the style completely overrides all the materials and colors applied. To see them again, select In Model from the drop-down menu and then select the Simple Style option.
Uninstalling or removing extensions
If you need to uninstall one or more extensions, the Extension Warehouse makes this task quick and easy:
- In SketchUp, select Extensions > Extension Warehouse and sign in to the Extension Warehouse.
- Select My Extensions from the user menu. The Extension Warehouse opens to the My Extensions tab.
-
You can uninstall all your extensions in one move by clicking Uninstall All in the top right of the My Extensions tab. Or, you might uninstall a single extension that you no longer use by clicking its Uninstall option.
Tip: When you uninstall an extension, it’s grayed out and moves to the bottom of the My Extensions tab, like the 3D Text Editor extension shown in the earlier figure. If you change your mind later, click Install to reinstall the extension. Or if you’re completely and totally done with the extension, click Remove to delete the extension from your My Extensions tab.
To uninstall an extension in the Extension Manager, follow these steps:
- Select Extensions > Extension Manager. The Extension Manager window appears.
- Click the Manage tab at the top.
- On the Home tab, click the Uninstall button next to the extension that you want to uninstall. After a few moments, your extension is removed from your copy of SketchUp. If you ever want to reinstall the extension, you can quickly access the extension on your My Extensions page in the Extension Warehouse.
LayOut
Компонент LayOut позволяет осуществлять оформление конструкторской документации на основе моделей, которые были созданы в программе SketchUp.
Сразу после запуска программа предлагает выбрать шаблон для дальнейшей работы. Для этого доступно несколько основных форматов: А3 и А4, книжная или альбомная ориентация листа.
Дополнительно можно указать тип бумаги: разлинованную (со вспомогательными линиями) или обычную, белую (в дальнейшем фон заливки можно будет изменить).
- Меню, расположенное в верхней части экрана.
- Рабочая область, расположенная по центру.
- Панели инструментов, расположенные вокруг рабочей области.
- Лоток по умолчанию, расположенный в правой части экрана.
Меню
В самой верхней части программы располагается Меню, которое позволяет получить быстрый доступ к основным функциям программы.
Оно состоит из таких пунктов, как:
- Файл. Для осуществления простейших операций с документами. Позволяет открывать, сохранять и загружать 3D модели. Здесь же, в меню «Настройки страницы» можно изменить тип и формат бумаги, изменить ориентацию листа на книжную или альбомную.
- Изменить. Для быстрого доступа к операциям для редактирования текущего документа. Включает такие операции, как отменить, вернуть, копировать, вставить. Здесь же находится меню «Параметры приложения», где можно настроить редактор изображений, текста и таблиц по умолчанию, изменить или добавить горячие клавиши для быстрого доступа к нужным компонентам программы. Выбрать настройки для запуска.
- Вид. Позволяет изменять масштаб рабочей области, активировать сетку, включать режим панорамы, использовать символы предупреждения.
- Текст. Для работы с надписями. Можно менять формат текста (курсив, полужирный, подчеркнутый, зачеркнутый). Осуществлять выравнивание, менять межстрочный интервал.
- Упорядочить. Для удобной работы со слоями. Здесь же можно включить или выключить привязку объектов к сетке.
- Инструменты. Перечень доступных для работы с файлом инструментов.
- Страницы. Позволяет удалять или добавлять страницы, перемещаться между уже созданными.
- Окно. Для управления элементами, находящимися в меню «Лоток по умолчанию», расположенном в правой части экрана.
- Справка. Для быстрого доступа к справочной информации.
Лоток по умолчанию
Панель инструментов, расположенная под «Меню» включает в себя основные для редактирования компоненты. При необходимости ее можно удалить или переместить в другое место на экране.
Лоток по умолчанию помогает быстро настраивать рабочую область, поменять цвет фона, толщину линий и другие необходимые параметры.
По умолчанию включает в себя:
- Цвета. Доступен выбор необходимого оттенка при помощи пипетки, используя схемы RGB, HSB, Оттенки серого, Изображение, Список. Здесь же можно настроить прозрачность альфа канала. Сохранить несколько цветов в палитру.
- Стиль фигуры. Можно выбрать заливку для фигуры, тип, цвет и толщину линий. Настроить стиль штриха.
- Заливка шаблоном. Для выбора доступны тональные заливки, символы материалов, геометрические плитки и шаблоны сайтов.
- Модель SketchUp. Для удобной работы с моделями, которые были созданы в программе SketchUp. Позволяет осуществлять визуализацию объектов.
- Стиль текста. Работа со шрифтами. Можно настроить выравнивание, межстрочный интервал, размер и тип шрифта.
- Страницы. Для создания и редактирования страниц, перемещения между ними.
- Слои. Для перемещения между слоями проекта. Можно настраивать их видимость, закреплять (защита от изменения) выбранные.
- Вырезки. Для более подробной визуализации документа. Включает в себя всевозможные стрелки и указатели, которые можно удобно размещать.
- Учебник. Краткая справка и помощь, касательно выбранного элемента. Информация будет меняться в зависимости от того, какой инструмент выбран.
При необходимости панель инструментов и меню Лоток по умолчанию можно закрыть. Благодаря этому можно значительно увеличить размер рабочей области. Вновь вернуть закрытые вкладки можно через пункт меню «Окно».
How to Install Sketchup Plugins
- Once you’ve downloaded a .rb file from the interwebs save it to where sketchup can find it. By default that location is your Sketchup/Tools folder. In older versions of sketchup you’ll need to use your Sketchup/Plugins folder.
- After your file is in that folder, close and restart Sketchup.
- When you reopen sketchup your plugin will initialize. Depending on the plugin, using it’s functions may vary. Consult the author if you have trouble finding out how to use your plugin. A couple common places it might show up is in the new ‘Plugin’ tab at the top of your program or in the menu you get from r-clicking on objects.
Auto-save and temporary back-up files
In SketchUp for Web, there are several mechanisms for ensuring that your modeling work is resilient to problems like file corruption, browser crashes, and Internet connectivity.
Auto-save
By default, every five minutes, SketchUp for Web will auto-save your modeling progress. If you keep an eye on the Save button in the upper-left, you may notice this auto-save behavior. When an auto-save happens, your file is saved in two important ways: First, a temporary, local back-up of your file is saved in your web browser cache. Second, if you have already saved your model to Trimble Connect, auto-save will send your file to Connect as a new revision. (The same thing will happen anytime you manually click the Save command).
Temporary back-up file
In addition to updating your Trimble Connect file record, auto-save also updates the temporary back-up file of your model stored in your web browser cache. So, if you haven’t yet saved a model to Trimble Connect, your modeling progress is saved in this temporary back-up file after the first auto-save. Still, it’s a good idea to save your file when you start modeling.
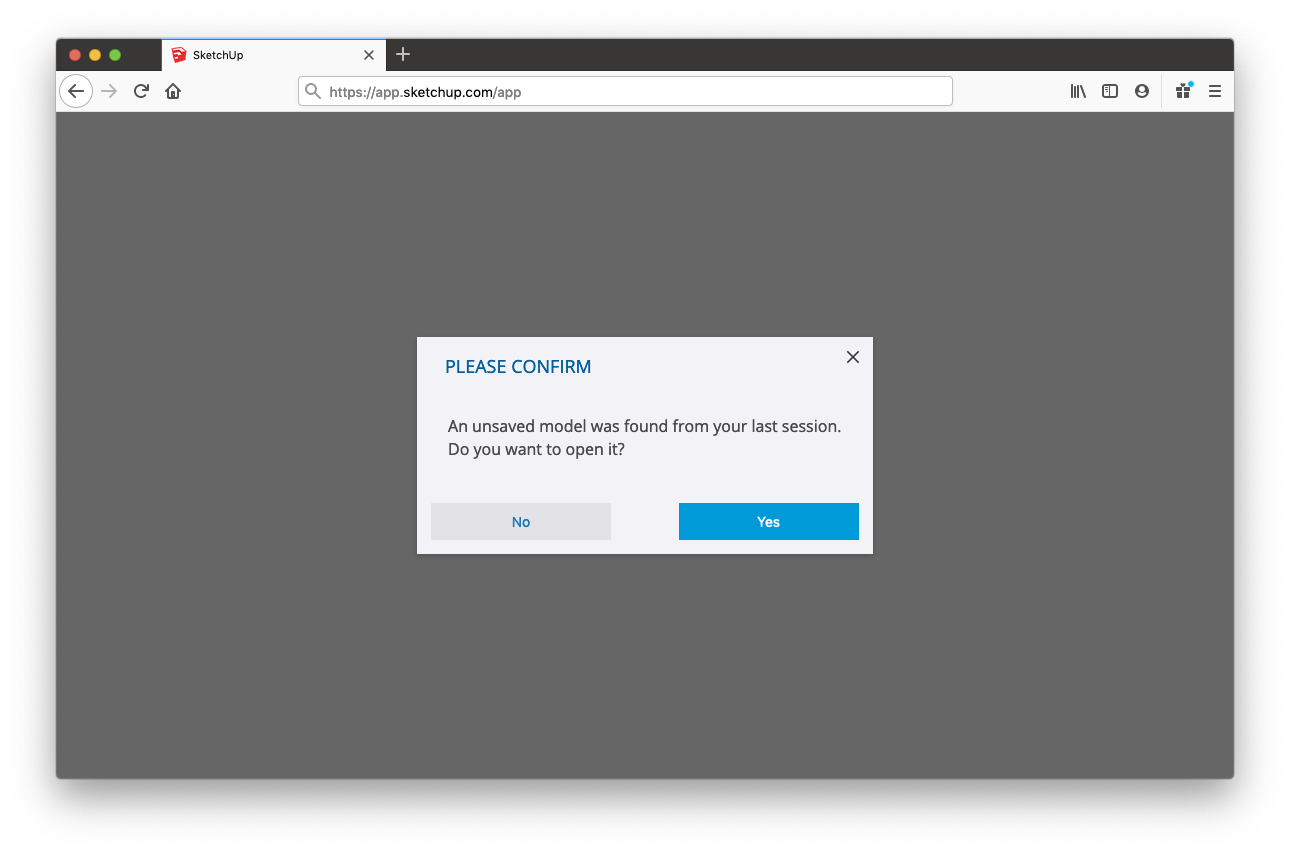
If you exit SketchUp for Web without saving — or if your web browser crashes — the next time you open SketchUp, the app will prompt you that a recovered file has been found and give you the option to open this last saved temporary back-up.
Similarly, if you lose Internet connectivity while modeling and close SketchUp for Web before you regain connectivity, you should still be prompted to recover your back-up file. If you notice that you have lost connectivity while using SketchUp, it’s a good idea to download your model as a back-up file.
When you are prompted to load a recovered file, the model will load but will not be associated with the file you’ve saved in Trimble Connect. If you want to recover the progress, use the Save As command to overwrite your saved file in Trimble Connect. Your last saved version is always available in Trimble Connect revision history, just in case you aren’t sure what to do with a recovered file.
Understanding how SketchUp for Web features work differently from the desktop version of SketchUp
Right now, here are a few key differences between the way SketchUp for Web and the desktop version of SketchUp work:
- Styles: SketchUp for Web includes many preset styles. However, you cannot edit styles or create your own style templates, as you can in SketchUp for Windows or Mac OS X.
- Materials: SketchUp for Web also includes many preset materials, but you can’t edit or create new materials.
- Keyboard shortcuts: SketchUp for Web shares functionality with your web browser. When familiar SketchUp keyboard shortcuts are in direct conflict with your browser, those shortcuts can’t be used. Don’t worry! We’re working on a way to customize shortcuts within SketchUp for Web. Keep your eyes open for changes.
- Extensions: Extensions are Ruby scripts that add functionality to SketchUp. In SketchUp for Web, extensions currently aren’t available. Because dynamic components also rely on Ruby, this feature isn’t currently available in SketchUp for Web either.
- High-resolution printing: You can print files or download your file in format, but you cannot yet print high-resolution images to scale via SketchUp for Web.
Almost everything about SketchUp is built into the SketchUp for Web. If your favorite feature isn’t there yet, please let us know via the SketchUp for Web (formerly my.SketchUp) user forum.
Note: LayOut and Style Builder, two separate applications that come with a SketchUp Pro license, are not on the SketchUp for Web development schedule.
- shortcuts
- shortcut
- keyboard shortcuts
- keyboard